목차: Series 1: Index and Overview (Link)
이전 글: Series 10: Dielectrics (Link)
다음 글: Series 12: Defocus Blur (Link)
이전 글에서 작성한 Diselectrics와 동일하게 Camera 역시 Debugging 하는데 어려움이 많다고 한다. 그래서 출처 1에서는 Camera 코드를 순차적으로 작성하여서 Debugging Overhead를 최소화하였다. 가장 먼저 FOV (Field Of View/Field Of Vision)을 조절하는 코드를 작성한다. 대부분의 게임과 동일하게 우리가 그리는 이미지는 정사각형이 아닌 관계로 FOV의 Horizontal (가로)과 Vertical (세로)의 크기가 다르다. 출처 1에서는 Vertical FOV를 사용하여서 코드를 작성한다. FOV를 조절하기 위해서 Degree (각도) 값을 사용한다.
MK: FOV (Field Of View/Field Of Vision)은 게임 등을 플레이 할 때 특정 순간에 관찰 가능한 범위를 의미한다. 예를 들어 포트나이트, 배틀그라운드와 같은 게임을 하면 총을 겨누고 있는 방향으로 대략 90도 정도의 이미지만 확인 할 수 있다. 이렇게 특정 순간에 모니터(화면)에 출력되는 범위를 의미한다. 보통 FOV 각도를 사용해서 화면에 표시되는 범위를 조절한다. 또한, Horizontal (가로), Vertical (세로), Diagonal (대각선) 기준을 사용할 수 있다 (출처 2).
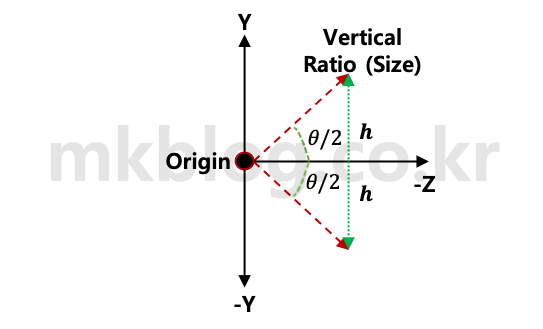 그림 1: Vertical FOV 계산 그림 (출처 1)
우리가 만든 Ray Tracer에서는 Origin (0, 0, 0)에서 Z 방향으로 -1에 해당하는 이미지를 생성한다. Z 값은 -1이 아닌 다른 -(마이너스) 값을 사용해도 된다. 그림 1은 FOV 설명하기 위한 그림이다. 그림 1에서 “h” 값을 변경하면 Z 값이 어떤 -(마이너스) 값이어도 표시되는 화면의 차이가 없이 만들 수 있다. “h”를 계산하기 위한 식은 아래와 같다.
- EQ1: h = tan(Θ/2)
아래 코드 1은 FOV 값을 사용한 Camera 코드이다. 변경한 Camera를 사용하기 위해서 Main 함수를 약간 수정하였다 (코드 2 참조).
MK: 동작 설명이 없어서 코드를 보고 설명을 조금 추가하였다. Camera Input으로 FOV 각도와 Aspect (화면 비율)을 사용하여 화면에 표시되는 부분을 계산한다. FOV 각도를 사용하여 물체가 보이는 Vertical 크기를 알 수 있다. 그럼 Aspecet (화면비율)값을 사용하여 Horizontal 크기를 계산 할 수 있다.
코드 1: Camera 코드
#ifndef MKCAMERA_H
#define MKCAMERA_H

#include "mkray.h"

class camera{
    public:
#MK: 코드1-1 - FOV에 따른 카메라 변경
	camera(float vfov, float aspect){
            float theta = vfov * M_PI/180;
            float halfHeight = tan(theta/2);
            float halfWidth = aspect * halfHeight;
            lowerLeftCorner = vec3(-halfWidth, -halfHeight, -1.0);
            horizontal = vec3(2*halfWidth, 0.0, 0.0);
            vertical = vec3(0.0, 2 * halfHeight, 0.0);
            origin = vec3(0.0, 0.0, 0.0);
        }
        ray getRay(float u, float v){
            return ray(origin, lowerLeftCorner + u * horizontal + v * vertical - origin);
        }

    private:
        vec3 origin;
        vec3 lowerLeftCorner;
        vec3 horizontal;
        vec3 vertical;
};

#endif
코드 2: Main 함수 수정 코드
#include <iostream>
#include <fstream>
#include "mkray.h"
#include "mkhitablelist.h"
#include "float.h"
#include "mksphere.h"
#include "mkcamera.h"
#include "mkmaterial.h"

using namespace std;

vec3 color(const ray &r, hitable *world, int depth){
    hitRecord rec;
    if(world->hit(r, 0.001, MAXFLOAT, rec)){
        ray scattered;
        vec3 attenuation;
        if(depth < 50 && rec.matPtr->scatter(r, rec, attenuation, scattered)){
            return attenuation * color(scattered, world, depth + 1);
        }
        else{
            return vec3(0, 0, 0);
        }
    }
    else{
        vec3 unitDirection = unitVector(r.direction());
        float t = 0.5 * (unitDirection.y() + 1.0);
        return (1.0 - t)*vec3(1.0, 1.0, 1.0) + t * vec3(0.5, 0.7, 1.0);
    }
}

int main(){
    int nx = 400;
    int ny = 200;
    int ns = 100;
    string fileName = "Ch10.ppm";
    ofstream writeFile(fileName.data());
    if(writeFile.is_open()){
        writeFile.flush();
        writeFile << "P3\n" << nx << " " << ny << "\n255\n";
        hitable *list[5];
        list[0] = new sphere(vec3(0, 0, -1), 0.5, new lambertian(vec3(0.1, 0.2, 0.5)));
        list[1] = new sphere(vec3(0, -100.5, -1), 100, new lambertian(vec3(0.8, 0.8, 0.0)));
        list[2] = new sphere(vec3(1, 0, -1), 0.5, new metal(vec3(0.8, 0.6, 0.2), 0.3));
        //list[3] = new sphere(vec3(-1, 0, -1), 0.5, new metal(vec3(0.8, 0.8, 0.8), 1.0));
        list[3] = new sphere(vec3(-1, 0, -1), 0.5, new dielectric(1.5));
        list[4] = new sphere(vec3(-1, 0, -1), -0.45, new dielectric(1.5));
        hitable *world = new hitableList(list, 5);
//MK: 코드 2-1 - 새로운 Camera 클래스 사용
        camera cam(45, float(nx)/float(ny));
        for(int j = ny - 1; j >= 0; j--){
            for(int i = 0; i < nx; i++){
                vec3 col(0.0, 0.0, 0.0);
                for(int s = 0; s < ns; s++){
                    float u = float(i + drand48()) / float(nx);
                    float v = float(j + drand48()) / float(ny);
                    ray r = cam.getRay(u, v);
                    col += color(r, world, 0);
                }
                col /= float(ns);
                col = vec3( sqrt(col[0]), sqrt(col[1]), sqrt(col[2]) );
                int ir = int(255.99 * col[0]);
                int ig = int(255.99 * col[1]);
                int ib = int(255.99 * col[2]);
                writeFile << ir << " " << ig << " " << ib << "\n";
            }
        }
        writeFile.close();
    }
    return 0;
}
그림 2는 위 코드를 컴파일하여서 실행한 결과 이미지이다. 그림 3은 FOV 각도 값을 45도로 변경한 결과 이미지이다. 그림 3은 FOV 각도가 더 작은 관계로 중간에 있는 구를 더 가까이서 보는 듯한 이미지가 생성된다.
 그림 2: FOV 각도를 90도로 설정한 결과 이미지
 그림 3: FOV 각도를 45도로 설정한 결과 이미지
Camera가 보는 관점을 달리하고 싶으면 여러 개의 항목을 추가로 고려해야 한다. 그림 4는 Viewpoint (관점)을 달리하기 위해서 필요한 요소를 정리한 그림이다. 가장 먼저 Camera가 위치하는 부분을 Lookfrom이라고 한다. 그리고 카메라 렌즈가 향하는 방향을 Lookat이라고 정의한다. 다음은 View Up (vup) 이다. vup은 카메라를 설치하는 방향이다. 예를 Lookfrom에서 Lookat을 보는 방향에서 카메라를 돌리면 이미지가 달라진다(코를 기준으로 얼굴을 돌린다고 가정하면 된다). 사진을 찍을 때 카메라를 가로 방향으로 촬영할 수 있고 세로 방향으로도 촬영할 수 있다. 이렇게 카메라가 Lookat을 보는 방향(?)을 설정하기 위해 vup을 사용한다 (비행기를 타고 앞을 볼 때 만약 비행기가 360도 회전을 하면 vup 값이 달라지는 것이다).
 그림 4: Camera 관점을 달리하기 위해 필요한 요소 (출처 1)
코드 3은 Lookfrom, Lookat, vup, vfov(FOV 각도)을 사용하여 Camera의 시각을 변경하는 코드이다. 카메라의 시각을 계산하기 위해서 W, U, V를 순서대로 계산한다. 계산된 값을 사용하여 화면에 출력되는 이미지 크기를 최종적으로 계산한다. 코드 4는 새로운 Camera 모듈을 사용하기 위해 수정한 Main 코드이다.
코드 3: Camera Class 수정 코드
#ifndef MKCAMERA_H
#define MKCAMERA_H

#include "mkray.h"

//MK: 코드 3-1 - Lookat, lookfrom, vup을 추가한 Camera 클래스
class camera{
    public:
        camera(vec3 lookfrom, vec3 lookat, vec3 vup, float vfov, float aspect){
            vec3 u, v, w;
            float theta = vfov * M_PI/180;
            float halfHeight = tan(theta/2);
            float halfWidth = aspect * halfHeight;
            origin = lookfrom;
            w = unitVector(lookfrom - lookat);
            u = unitVector(cross(vup, w));
            v = cross(w, u);
            lowerLeftCorner = vec3(-halfWidth, -halfHeight, -1.0);
            lowerLeftCorner = origin - halfWidth*u - halfHeight*v - w;
            horizontal = 2 * halfWidth * u;
            vertical = 2 * halfHeight * v;
        }
        ray getRay(float u, float v){
            return ray(origin, lowerLeftCorner + u * horizontal + v * vertical - origin);
        }

    private:
        vec3 origin;
        vec3 lowerLeftCorner;
        vec3 horizontal;
        vec3 vertical;
};

#endif
코드 4: Main 함수 수정 코드
#include <iostream>
#include <fstream>
#include "mkray.h"
#include "mkhitablelist.h"
#include "float.h"
#include "mksphere.h"
#include "mkcamera.h"
#include "mkmaterial.h"

using namespace std;

vec3 color(const ray &r, hitable *world, int depth){
    hitRecord rec;
    if(world->hit(r, 0.001, MAXFLOAT, rec)){
        ray scattered;
        vec3 attenuation;
        if(depth < 50 && rec.matPtr->scatter(r, rec, attenuation, scattered)){
            return attenuation * color(scattered, world, depth + 1);
        }
        else{
            return vec3(0, 0, 0);
        }
    }
    else{
        vec3 unitDirection = unitVector(r.direction());
        float t = 0.5 * (unitDirection.y() + 1.0);
        return (1.0 - t)*vec3(1.0, 1.0, 1.0) + t * vec3(0.5, 0.7, 1.0);
    }
}

int main(){
    int nx = 400;
    int ny = 200;
    int ns = 100;
    string fileName = "Ch10.ppm";
    ofstream writeFile(fileName.data());
    if(writeFile.is_open()){
        writeFile.flush();
        writeFile << "P3\n" << nx << " " << ny << "\n255\n";
        hitable *list[5];
        list[0] = new sphere(vec3(0, 0, -1), 0.5, new lambertian(vec3(0.1, 0.2, 0.5)));
        list[1] = new sphere(vec3(0, -100.5, -1), 100, new lambertian(vec3(0.8, 0.8, 0.0)));
        list[2] = new sphere(vec3(1, 0, -1), 0.5, new metal(vec3(0.8, 0.6, 0.2), 0.3));
        //list[3] = new sphere(vec3(-1, 0, -1), 0.5, new metal(vec3(0.8, 0.8, 0.8), 1.0));
        list[3] = new sphere(vec3(-1, 0, -1), 0.5, new dielectric(1.5));
        list[4] = new sphere(vec3(-1, 0, -1), -0.45, new dielectric(1.5));
        hitable *world = new hitableList(list, 5);
//MK: 코드 4-1 - 새로운 Camera를 사용하기 위한 Class 추가
        camera cam(vec3(-2,2,1), vec3(0,0,-1), vec3(0,1,0), 45, float(nx)/float(ny));
        for(int j = ny - 1; j >= 0; j--){
            for(int i = 0; i < nx; i++){
                vec3 col(0.0, 0.0, 0.0);
                for(int s = 0; s < ns; s++){
                    float u = float(i + drand48()) / float(nx);
                    float v = float(j + drand48()) / float(ny);
                    ray r = cam.getRay(u, v);
                    col += color(r, world, 0);
                }
                col /= float(ns);
                col = vec3( sqrt(col[0]), sqrt(col[1]), sqrt(col[2]) );
                int ir = int(255.99 * col[0]);
                int ig = int(255.99 * col[1]);
                int ib = int(255.99 * col[2]);
                writeFile << ir << " " << ig << " " << ib << "\n";
            }
        }
        writeFile.close();
    }
    return 0;
}
위 코드를 실행하면 그림 5와 같은 결과 이미지를 확인 할 수 있다. 그림 6은 vfov (각도)를 45도로 변경한 결과 이미지이다.
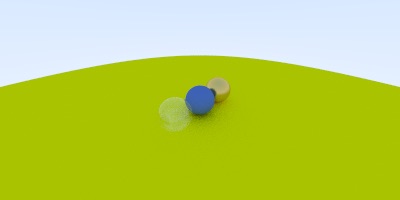 그림 5: FOV 각도를 90도로 설정한 결과 이미지
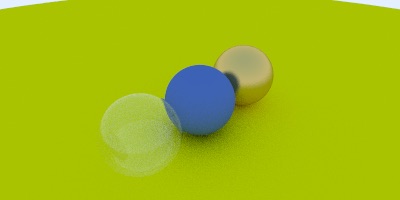 그림 6: FOV 각도를 45도로 설정한 결과 이미지
카메라 위치를 변경하면 지금까지 우리가 작성한 그림이 많이 달라 보인다.
출처
- http://www.realtimerendering.com/raytracing/Ray%20Tracing%20in%20a%20Weekend.pdf
- https://en.wikipedia.org/wiki/Field_of_view_in_video_games